If you've ever wondered how apps like Zomato, Google Maps, or your bank's mobile app pull live data from a server, the answer is almost always an API. In this guide, we'll break down exactly what an API is, how it works behind the scenes, and then build a real, working API using PHP and MySQL.
What is an API?
API stands for Application Programming Interface. In plain terms, an API is a set of rules that lets one piece of software talk to another. It's the messenger that takes a request from one application, tells another application (usually a server) what to do, and brings the response back.
You interact with APIs every single day without realizing it - checking the weather on your phone, paying through a UPI app, logging in with "Sign in with Google," or tracking a DTDC parcel. None of these apps store all the data themselves; they ask an API for it.
The Restaurant Analogy
Think of a restaurant. You (the customer) don't walk into the kitchen and cook your own food. Instead, you tell the waiter what you want. The waiter takes your order to the kitchen, the kitchen prepares it, and the waiter brings the food back to your table.
Why APIs Matter
- Separation of concerns - your front-end (website/app) and back-end (database/server logic) can be built and updated independently.
- Reusability - one API can serve your website, mobile app, and a third-party partner at the same time.
- Security - the client never touches your database directly; the API controls exactly what data goes in and out.
- Scalability - you can scale your API server separately from your front-end.
How Does an API Work? (Step-by-Step)
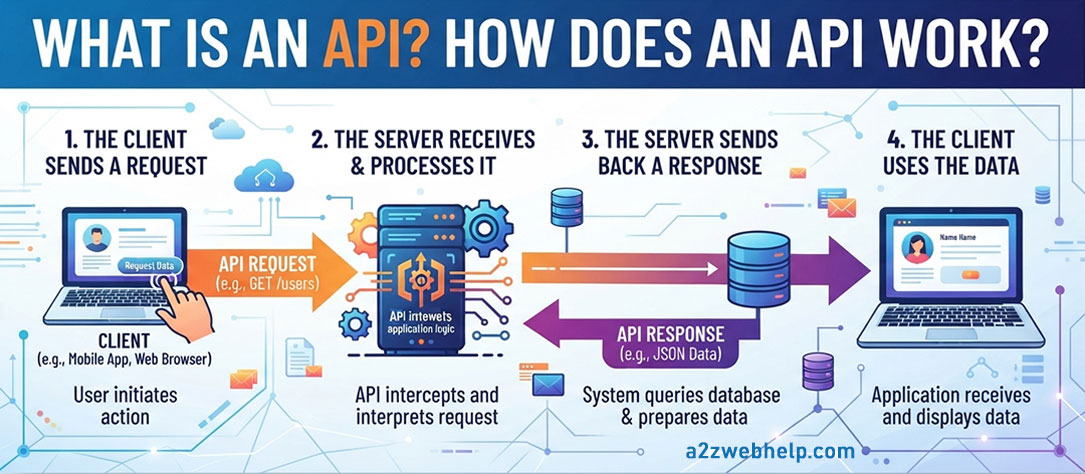
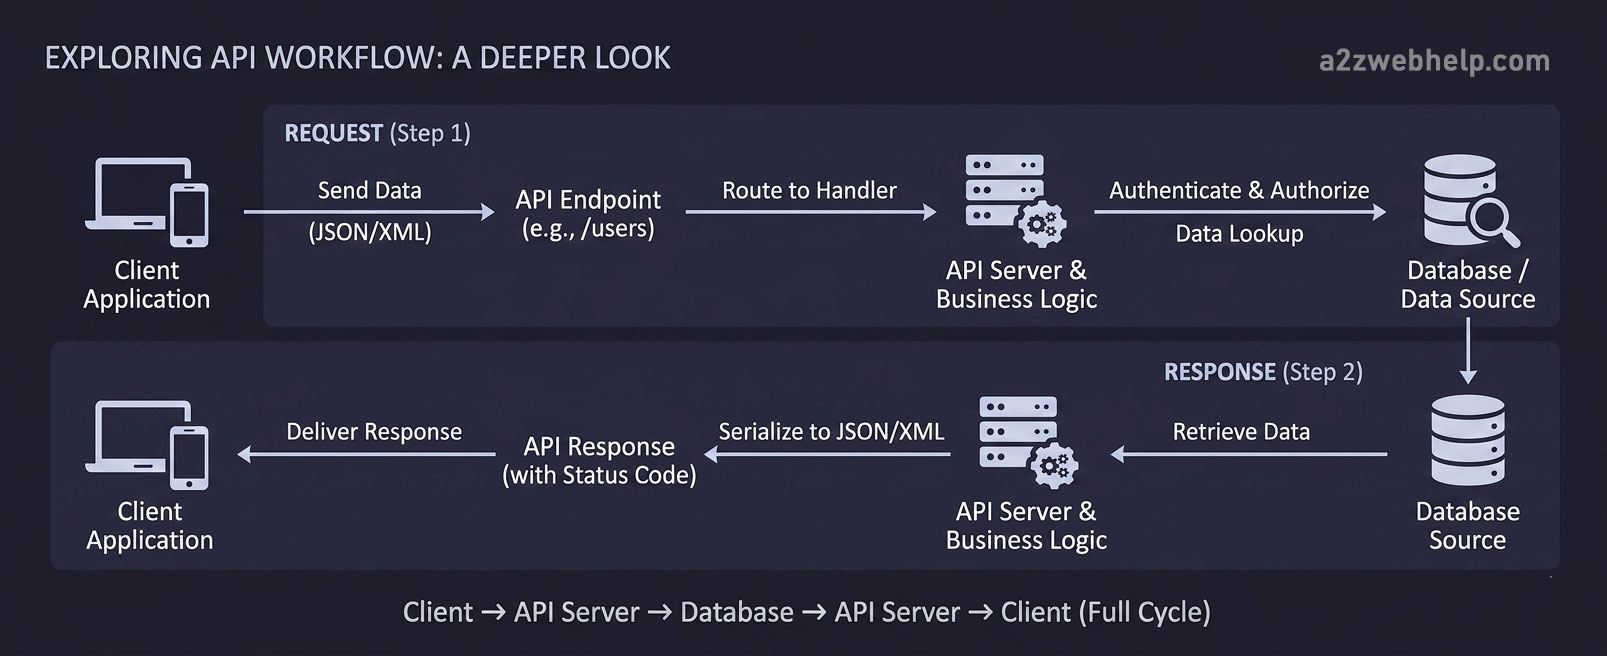
At a basic level, every API interaction follows the same request-response cycle. Here's what happens, step by step, when an app calls an API:
The client sends a request
Your app (browser, mobile app, or another server) sends an HTTP request to a specific
endpoint - a URL like https://api.example.com/products. This
request includes a method (what action to perform) and sometimes a
body (data being sent).
The server receives and processes it
The API server (in our case, a PHP script) receives the request, checks what was asked for, and usually queries a database (MySQL) to fetch or store data.
The server sends back a response
The server responds with data - almost always in JSON format today - along
with an HTTP status code telling the client whether it worked (e.g., 200 OK) or
failed (e.g., 404 Not Found).
The client uses the data
The app takes that JSON response and displays it - a product list, a weather forecast, a shipping rate, whatever it may be.
HTTP Methods: The "Verbs" of an API
Every API request uses a method that tells the server what kind of action to perform:
| Method | Purpose | Example |
|---|---|---|
| GET | Fetch/read data | Get list of products |
| POST | Create new data | Add a new product |
| PUT / PATCH | Update existing data | Edit a product's price |
| DELETE | Remove data | Delete a product |
HTTP Status Codes
| Code | Meaning |
|---|---|
| 200 OK | Request succeeded |
| 201 Created | New resource created successfully |
| 400 Bad Request | Client sent invalid data |
| 401 Unauthorized | Authentication required or failed |
| 404 Not Found | Requested resource doesn't exist |
| 500 Server Error | Something broke on the server |
Why APIs Use JSON
JSON (JavaScript Object Notation) is a lightweight, text-based format that's easy for both humans and machines to read. Almost every modern API - whether built in PHP, Node.js, or Python - sends data back as JSON because virtually every programming language can parse it natively.
JSON Example
{
  "id": 1,
  "name": "Wireless Mouse",
  "price": 499.00,
  "in_stock": true
}
Let's Build a Real PHP + MySQL API
Enough theory - let's build an actual working API. We'll create a simple Products API that can list all products, fetch a single product, and create a new product. This is the exact foundation you'd use for something like a shipping-rate API, a product catalog API, or any data-driven endpoint.
Step 1: Create the Database Table
Run this SQL in phpMyAdmin to create a simple products table:
SQL
CREATE TABLE products (
    id INT AUTO_INCREMENT PRIMARY KEY,
    name VARCHAR(150) NOT NULL,
    price DECIMAL(10,2) NOT NULL,
    in_stock TINYINT(1) DEFAULT 1,
    created_at TIMESTAMP DEFAULT CURRENT_TIMESTAMP
);

INSERT INTO products (name, price, in_stock) VALUES
('Wireless Mouse', 499.00, 1),
('Mechanical Keyboard', 2199.00, 1),
('USB-C Hub', 899.00, 0);
Step 2: Create the Database Connection File
Create db.php. Every API file will include this to talk to MySQL:
db.php
<?php
define('DB_HOST', 'localhost');
define('DB_NAME', 'your_database_name');
define('DB_USER', 'your_database_user');
define('DB_PASS', 'your_database_password');

function getDbConnection(): PDO
{
    static $pdo = null;

    if ($pdo === null) {
        $dsn = 'mysql:host=' . DB_HOST . ';dbname=' . DB_NAME . ';charset=utf8mb4';

        $pdo = new PDO($dsn, DB_USER, DB_PASS, [
            PDO::ATTR_ERRMODE            => PDO::ERRMODE_EXCEPTION,
            PDO::ATTR_DEFAULT_FETCH_MODE => PDO::FETCH_ASSOC,
        ]);
    }

    return $pdo;
}
Step 3: Build the GET Endpoint (List All Products)
Create api/products.php. This will handle GET requests to list every product:
api/products.php
<?php
header('Content-Type: application/json');
require_once __DIR__ . '/../db.php';

$pdo = getDbConnection();
$method = $_SERVER['REQUEST_METHOD'];

if ($method === 'GET' && !isset($_GET['id'])) {

    $stmt = $pdo->query('SELECT * FROM products ORDER BY id DESC');
    $products = $stmt->fetchAll();

    http_response_code(200);
    echo json_encode([
        'success' => true,
        'count'   => count($products),
        'data'    => $products,
    ]);
    exit;
}
Save this and open http://localhost/api/products.php in your browser. You should
see a JSON response with all your products - that's your first working API endpoint!
Step 4: Get a Single Product by ID
Add this block into the same file, right after the block above:
api/products.php (continued)
if ($method === 'GET' && isset($_GET['id'])) {

    $id = (int) $_GET['id'];

    $stmt = $pdo->prepare('SELECT * FROM products WHERE id = ?');
    $stmt->execute([$id]);
    $product = $stmt->fetch();

    if (!$product) {
        http_response_code(404);
        echo json_encode(['success' => false, 'message' => 'Product not found']);
        exit;
    }

    http_response_code(200);
    echo json_encode(['success' => true, 'data' => $product]);
    exit;
}
Now visiting api/products.php?id=1 will return just that one product.
Step 5: Build the POST Endpoint (Create a New Product)
Add this block to handle creating new products via POST:
api/products.php (continued)
if ($method === 'POST') {

    $input = json_decode(file_get_contents('php://input'), true);

    $name    = trim($input['name'] ?? '');
    $price   = $input['price'] ?? null;
    $inStock = isset($input['in_stock']) ? (int) $input['in_stock'] : 1;

    if ($name === '' || $price === null) {
        http_response_code(400);
        echo json_encode(['success' => false, 'message' => 'name and price are required']);
        exit;
    }

    $stmt = $pdo->prepare(
        'INSERT INTO products (name, price, in_stock) VALUES (?, ?, ?)'
    );
    $stmt->execute([$name, $price, $inStock]);

    http_response_code(201);
    echo json_encode([
        'success' => true,
        'message' => 'Product created',
        'id'      => $pdo->lastInsertId(),
    ]);
    exit;
}

// If no method matched
http_response_code(405);
echo json_encode(['success' => false, 'message' => 'Method not allowed']);
file_get_contents('php://input') instead of
$_POST. We'll cover exactly how to send that JSON body from the front end in the
next tutorial.
Step 6: Test Your API
You can test it two ways:
- GET requests - just open the URL directly in your browser, e.g.
api/products.phporapi/products.php?id=2. - POST requests - GET requests can't be tested in a browser address bar. Use a free tool like Postman or Insomnia: set the method to POST, the URL to your endpoint, the body type to "raw JSON", and send something like:
POST Body (JSON)
{
  "name": "HDMI Cable",
  "price": 299.00,
  "in_stock": 1
}
If everything is wired correctly, you'll get back a 201 Created response with the new product's ID.
Security Notes Before You Go Live
- Never expose this API publicly without authentication if it allows creating/editing data - anyone could spam your database.
- Always use prepared statements (like we did with PDO) to prevent SQL injection - never concatenate raw input into a query.
- Validate and sanitize every input before it touches your database.
- Consider adding an API key or token check for write operations (POST/PUT/DELETE) - we'll cover this in a future tutorial.
- Use HTTPS in production so data isn't sent in plain text.