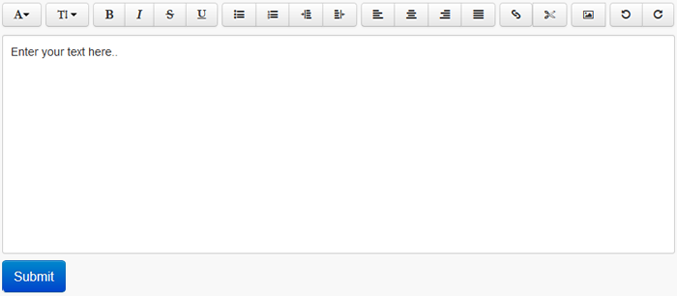
The jQuery Bootstrap WYSIWYG plugin can convert any DIV into a rich text
editor. You can download the js file and get detail information from
here. This rich text editor use Font Awesome to create vector icons. You can download
Font Awesome css file and font files from
here.
Also this requires some other jQuery and js files that you will get in this
project files.

Lets create a DIV with id 'editor', Our program will convert that DIV to a
Rich Text Editor.
HTML Code:
<div id="editor"> Enter your text here.. </div>
Now, lets created the buttons above the editor. so put the following code
above the editor DIV.
HTML Code
<div class="btn-toolbar" data-role="editor-toolbar" data-target="#editor">
<div class="btn-group">
<a class="btn dropdown-toggle" data-toggle="dropdown" title="Font">
<i class="icon-font"></i><b class="caret"></b></a>
<ul class="dropdown-menu">
</ul>
</div>
<div class="btn-group">
<a class="btn dropdown-toggle" data-toggle="dropdown" title="Font Size">
<i class="icon-text-height"></i> <b class="caret"></b></a>
<ul class="dropdown-menu">
<li><a data-edit="fontSize 5"><font size="5">Huge</font></a></li>
<li><a data-edit="fontSize 3"><font size="3">Normal</font></a></li>
<li><a data-edit="fontSize 1"><font size="1">Small</font></a></li>
</ul>
</div>
<div class="btn-group">
<a class="btn" data-edit="bold" title="Bold (Ctrl/Cmd+B)">
<i class="icon-bold"></i></a>
<a class="btn" data-edit="italic" title="Italic (Ctrl/Cmd+I)">
<i class="icon-italic"></i></a>
<a class="btn" data-edit="strikethrough" title="Strikethrough">
<i class="icon-strikethrough"></i></a>
<a class="btn" data-edit="underline" title="Underline (Ctrl/Cmd+U)">
<i class="icon-underline"></i></a>
</div>
<div class="btn-group">
<a class="btn" data-edit="insertunorderedlist" title="Bullet list">
<i class="icon-list-ul"></i></a>
<a class="btn" data-edit="insertorderedlist" title="Number list">
<i class="icon-list-ol"></i></a>
<a class="btn" data-edit="outdent" title="Reduce indent (Shift+Tab)">
<i class="icon-indent-left"></i></a>
<a class="btn" data-edit="indent" title="Indent (Tab)">
<i class="icon-indent-right"></i></a>
</div>
<div class="btn-group">
<a class="btn" data-edit="justifyleft" title="Align Left (Ctrl/Cmd+L)">
<i class="icon-align-left"></i></a>
<a class="btn" data-edit="justifycenter" title="Center (Ctrl/Cmd+E)">
<i class="icon-align-center"></i></a>
<a class="btn" data-edit="justifyright" title="Align Right (Ctrl/Cmd+R)">
<i class="icon-align-right"></i></a>
<a class="btn" data-edit="justifyfull" title="Justify (Ctrl/Cmd+J)">
<i class="icon-align-justify"></i></a>
</div>
<div class="btn-group">
<a class="btn dropdown-toggle" data-toggle="dropdown" title="Hyperlink">
<i class="icon-link"></i></a>
<div class="dropdown-menu input-append">
<input class="span2" placeholder="URL" type="text" data-edit="createLink"/>
<button class="btn" type="button">Add</button>
</div>
<a class="btn" data-edit="unlink" title="Remove Hyperlink">
<i class="icon-cut"></i></a>
</div>
<div class="btn-group">
<a class="btn" title="Insert picture (or just drag & drop)" id="pictureBtn">
<i class="icon-picture"></i></a>
<input type="file" data-role="magic-overlay" data-target="#pictureBtn"
data-edit="insertImage" />
</div>
<div class="btn-group">
<a class="btn" data-edit="undo" title="Undo (Ctrl/Cmd+Z)">
<i class="icon-undo"></i></a>
<a class="btn" data-edit="redo" title="Redo (Ctrl/Cmd+Y)">
<i class="icon-repeat"></i></a>
</div>
<input type="text" data-edit="inserttext" id="voiceBtn" x-webkit-speech="">
</div>
The above code will generate the following icons.

Now include the following JavaScript files. You will get all required css and JavaScript files for the project folder after download.
<script type="text/javascript" src="js/jquery.js"></script>
<script type="text/ascript" src="js/bootstrap.js"></script>
<script type="text/javascript" src="js/bootstrap-wysiwyg.js"></script>
<script src="external/jquery.hotkeys.js"></script>
<script src="external/google-code-prettify/prettify.js"></script>
<script src=&quo<script src="js/bootstrap-wysiwyg.js"></script>
jQuery Script
<script>
$(function(){
function initToolbarBootstrapBindings() {
var fonts = ['Serif', 'Sans', 'Arial', 'Arial Black', 'Courier',
'Courier New', 'Comic Sans MS', 'Helvetica', 'Impact', 'Lucida Grande',
'Lucida Sans', 'Tahoma', 'Times',
'Times New Roman', 'Verdana'],
fontTarget = $('[title=Font]').siblings('.dropdown-menu');
$.each(fonts, function (idx, fontName) {
fontTarget.append($('<li><a data-edit="fontName ' + fontName +'"
style="font-family:\''+ fontName +'\'">'+fontName + '</a></li>'));
});
$('a[title]').tooltip({container:'body'});
$('.dropdown-menu input').click(function() {return false;})
.change(function () {$(this).parent('.dropdown-menu').
siblings('.dropdown-toggle').dropdown('toggle');})
.keydown('esc', function () {this.value='';$(this).change();});
$('[data-role=magic-overlay]').each(function () {
var overlay = $(this), target = $(overlay.data('target'));
overlay.css('opacity', 0).css('position', 'absolute').offset(target.offset())
.width(target.outerWidth()).height(target.outerHeight());
});
if ("onwebkitspeechchange" in document.createElement("input")) {
var editorOffset = $('#editor').offset();
$('#voiceBtn').css('position','absolute').offset({top: editorOffset.top,
left: editorOffset.left+$('#editor').innerWidth()-35});
} else {
$('#voiceBtn').hide();
}
};
function showErrorAlert (reason, detail) {
var msg='';
if (reason==='unsupported-file-type') { msg = "Unsupported format " +detail; }
else {
console.log("error uploading file", reason, detail);
}
$('<div class="alert"><button type="button" class="close" data-dismiss="alert">
×</button>'+
'<strong>File upload error</strong> '+msg+' </div>').prependTo('#alerts');
};
initToolbarBootstrapBindings();
$('#editor').wysiwyg({ fileUploadError: showErrorAlert} );
window.prettyPrint && prettyPrint();
});
</script>
Output:
How to Get data in PHP?
Though php can't read/ get data from DIV directly, we need to write some
JavaScript code to fetch data for editor DIV and put it in a Text Area, So we
can get the data easily with $_POST or $_REQUEST on submitting the form. Create
a hidden text area in the form and on form submit call the following function to
load data from div to text area.
HTML Code
<textarea rows="2" name="desc" cols="20" style="display:none; "></textarea>
HTML Form
<form method="POST" name="form1" action="#" onsubmit="loadVal();">
<textarea rows="2" name="desc" cols="20" style="display:none; "></textarea>
</form>
JavaScript code:
function loadVal(){
desc = $("#editor").html();
document.form1.desc.value = = desc;
}
Download File
Total Downloads: 12462

